
Hello,
Today I want to show you how to create WordPress forms and display on any wordpress page or post without writing code. At the end of this tutorial, you will be able to create unlimited form with unlimited fields and insert them on any page in your WordPress site or blog.
Let’s get started.
You can watch the following playlist or follow along in the ttutorial in this page.
Settings
In order to create WordPress forms, First you will have to go to your WordPress dashboard and install this plugin onto your site so you can start using it.
Once the plugin is installed, you will have to go to the plugin’s settings page by going to “MPMF > Settings” so that you can setup the minimum requirements of the plugin to get it working. Head on to that page and enter your email address and phone number and then click on “Update Contact Details”. Your email address will be used to receive the form data sent by your visitors on your website, so enter an email address you have access to. The email address and form number can be optionally displayed on the default page for the visitors to get your contact details.
You can also customize the messages or notifications that will be used when someone submits a form, this includes error and success messages that will be used when a form is submitted with a success or error. This can be done in the settings page under the “Email Settings” tab.
If you prefer to use the Google CAPTCHA feature built in the plugin, then you can follow the links on the “reCAPTCHA” tab on the settings page. Once you are satisfied with the settings then you can move on to create your forms.
Creating a blank form
Creating a form is very easy, just go to the main page by clicking “MPMF” on the left side of the WordPress dashboard. You will see a page with two sections on the main page – “Form List / Item List” and “New Form”. Under “New Form” enter the name of the new form you want to create in the textbox labeled “Form Name” and click on the “Create” button.
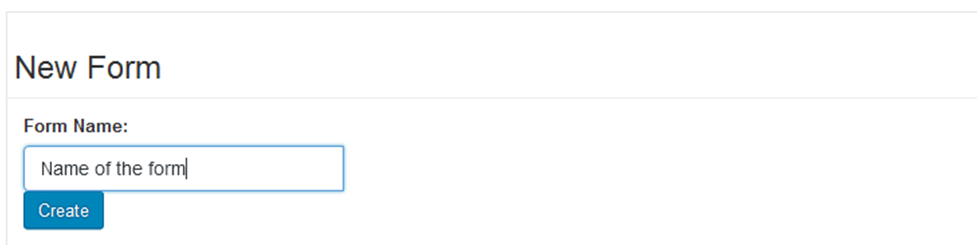
This will create a new blank form and it will be displayed under the “Form List / Item List” section. It will be displayed with a shortcode that you can use to include the form in any page or post.
Insert the shortcode in a page
Now under the “Form List / Item List” section, copy the shortcode corresponding to the form you created and go to “Pages >Add Page” to create a new page and call it anything.

Paste the shortcode on this page and publish or save. You can preview your page and it will tell you that the form does not have any fields. Don’t worry, we will add fields next.
Adding fields to your form
To add fields, click on the “Edit Fields” button corresponding to the form you want to add fields to in the form list. You will be presented with a page with an empty page with a left column that has a lot of buttons on the right.
The buttons to the right are used to add fields as you wish, each button is used for a specific type of form field. The labels explain what the field the button can be used to insert.
As you can see, you can click on “Text” to insert a normal textbox, “Number” to insert a number field, “Textarea” to insert a textarea and so on and so forth.
 There are some user/person specific fields you can get under the “User Fields” section. This will include general personal and contact details such as name, surname, email address, street address and others. All fields under this section can be inserted with a single click of a button and they are preconfigured because they are commonly used.
We can also add an anti-spam CAPTCHA with a single click under the “Security / Anti Spam” section. This can be used to protect our form from being submitted by robots.
Now let’s add a few fields on our form and see what we can do.
Let do a simple text box slowly and explain what each of the options stand for. Click on the ”Text” button on the right and you will see a popup appear with a form you can use to enter the details of the form.
Field Label – The label label for the field like “First Name” for the first name field
Field Default – This is the value that will be displayed inside the field if it is not yet filled. This will be used as a place holder for the field value
Field Name – is the name of the field. It is used to identify the field so that its value can be grabbed when processing the form. Give it a name or leave the default name assigned to it.
Field ID – The id is used if for styling if you will be writing your custom CSS code to style the field
Is the field editable? – “Read Only” means the visitors will not be able to type or change the value. The predefined value will be used. “Editable” means visitors will be able to type or change the value of the field. Editable is the default as you will create forms to capture data, so in most cases you will have to use “Editable” for most fields.
Sort Order – is used to sort the fields before they are displayed in the form. The fields with the lowest sort order will be displayed first and the largest value will be displayed last. If no sort order is specified, “0” will be assigned and the fields will be displayed in the order in which they were created starting with those whose sort order is zero, followed by those with a defined order.
Predefined Value – is the value that the field assumes if a value was not entered by the user. This is helpful for read only field whose values are determined by others in the form. Such as answers to a calculation.
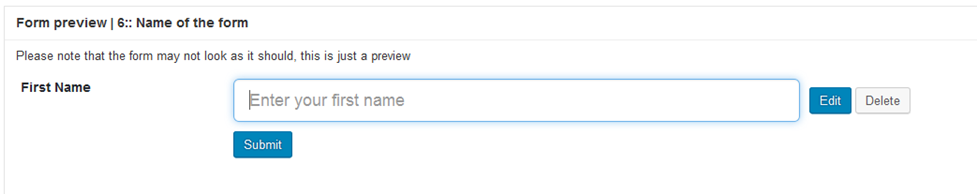
Fill in all the necessary details in the dialog and click the “Add Form Field” button to add the field to the form. You will see the field in the form as below.
Repeat the above step for all other required fields in your form.
There are some special fields we need to look at. Sometimes there is a situation where you want to add multiple options for a certain field. This will be useful when you want a user to choose one from many options. In this case you can use the select field. So, go ahead and click the “Select/Drop Down” button to add a dropdown list.
The form for customizing the dropdown list is as follows:
Note that it has an additional section labeled “Field Options”, you can use this sections to add the options for this field. You can click on the “+Add Option” to add another option to the list or click the red “-“ button to remove an option. Add as many options as you want and click the “Add Form Field” button to save the field and its options. For each field, you may specify the “option Label”, “Option Value” and “Sort Order”, those are self explanatory.
This last screenshot will look and work similarly for the other input types that support multiple options like the “Radio” and “Checkbox” group fields.